Do you need to build a WordPress website but you don’t know how?
We will give you a step-by-step guide on how to build a WordPress website in 15 steps.
We have provided the necessary links and resources for you to succeed.
Follow our guide and build your WordPress website today!
If you are a regular reader of our blog, you will have read it many times before: WordPress is one of the best open-source software to create a website. Everyone can use it and build their website. Using different WordPress plugins and themes, the possibilities are endless.
WordPress is one of the most popular content management systems. 44 % of all websites use WordPress!
But how do you start your website? Or where do you find the necessary information to sharpen your skills, and what do you really need? WP-headlines gives you 15 steps to build a WordPress website. Think of it as a crash course: how to make a website? Don’t worry, we also give the necessary links to more extensive courses.
Whether you’re a novice web designer or advanced, building a website can be a daunting task. Unless you have a huge budget, your options are very limited. And even if you have a decent budget, it will be very difficult to hire someone to build your website for you. That’s why WordPress is a great option for a majority of people.
1. Determine the objectives of your website
Before you build a WordPress website, it is crucial to think about the essence. What is the purpose of your website? What do you want to achieve with your website?
A website can serve to spread information or news. But it can also serve to generate leads or price requests. Or do you want to start a webshop and sell goods and services?
Before you start a website, it is vital to think about what you want to achieve with it. What is the purpose of your website? Do you want to sell products, provide information, or both? Once you know the purpose of your site, you can start thinking about the design and content. What kind of look do you want for your site? What kind of information do you want to include? By taking the time to think about these things before you start, you’ll be able to create a website that is both effective and successful.
“If you don’t know why you’re building a website, you’ll never build a successful one.”
Can you already start with your website? No. You now have a goal, but how will you realize it? Take a moment to define your SMART goals. SMART stands for Specific, Measurable, Attainable, Relevant, and Timely.
So make your goal specific. This can be done through several small goals. In addition, make your goals measurable, achievable, relevant, and time-bound.
Some find this a difficult step. However, this step is important because it gives you, but also your graphic designer and web designer, something to hold on to and direction to the project. Not every website wants to get as many leads as possible. Sometimes it is very important to inform to explain a new concept for example.
But how are you going to measure your goals? Are your goals achievable? Are your goals relevant? And make your goals time-related.
Some examples of SMART goals are number of visitors, number of price requests, position in Google search results, number of downloads of your white paper, number of subscriptions to your newsletter, number of followers on social media, and so on.
2. Make an inventory of your content (Texts, Video & Images)
We are almost ready for the installation of WordPress. But before we get started, it’s worth thinking about the question: “What do you want to say on your website, and what content do you have available?”.
I.e. which services do you want to offer and do you already have some texts? Which images of my products or services do I already have or do I still need to create? Do I have testimonials and can I use them on the website?
Take some time to describe precisely what you want to say on your website. Don’t take the design aspect into account. Provide texts of at least 600 words per chapter or page. Also, collect all your available images and videos in a folder.
Also, take into account the size of your images. The larger your image size, the slower your website will be. This is of course not desired. We, therefore, recommend that your images are never larger than 500KB and ideally are of the JPG type. For image optimization, please read further.
This phase is also often skipped, but it is crucial. It will give you a clear overview of what you have and whether you can use it on your website.
3. Define your corporate identity
You can start to build a WordPress website without a corporate identity. But that’s not the best. You want everything to have the same look and not become a coloring book. To make a professional impression on your target audience, a clearly defined corporate identity is fundamental.
If you’re just starting out with your website, you may be tempted to skimp on developing a corporate identity. But trust us, it’s worth taking the time to do it right! A clearly defined corporate identity will give your website a professional look and feel, making it much easier for your target audience to remember and recognize. Plus, it will help you stand out from the competition. So take the time to develop a solid corporate identity for your website, and you’ll be glad you did!
The document that defines your corporate identity contains at least the following elements:
- the logo in positive colors (the regular logo) and negative colors (for dark background)
- What colors may be used in the various media on which you post content about your business?
- Which fonts may be used? Usually defined for titles and body text.
- Other graphical instructions for use on various media.
The purpose of these strict guidelines is to pursue a brand identity and recognition of the company. This makes it easier to stay “top of mind” and to be recognizable on different advertising media.
If you’re running a business, you’ll want to ensure that everything – from your website to your business cards – has a consistent look. This helps you create a professional impression and build trust with your target audience. Creating a corporate identity can be a complex process, but it’s worth taking the time to do it right. If you’re not sure where to start, there are plenty of resources available to help you.
4. Take an introductory course in WordPress online
WordPress is one of the easiest ways to create a website if you’re building one yourself. However, like any website builder, there is a learning curve involved. With an online introductory WordPress course, you will quickly learn the basics of WordPress, which will make building your website feel a little more familiar and less of a hassle. There are many tips & tricks for WordPress that will make building your website just a little bit easier.
Online there is plenty of material available to hone your WordPress skills. For a small fee, you can turn yourself into a real WordPress wizard.
Many will ask why to pay for a WordPress course. And we do understand this reasoning. The free WordPress courses often only cover the surface of WordPress. While paying courses are based on years of experience and expertise. This experience provides a broader base of knowledge. This results in handy tips and tricks to make your website look more professional. But most of all, it makes it easier for you to run it.
There are also numerous Facebook groups.
Some interesting links :
- https://wp101.com/
- https://wpsessions.com/
- https://www.udemy.com/courses/search/?ref=home&src=ukw&q=wordpress
5. Find a good hosting provider
We all want value for money, and so the rule often seems to be that we want to host as cheaply as possible. This has led to a gigantic “race to the bottom” in hosting companies. Usually, only the big ones have survived, often at the expense of the small ones.
Among other things, what should you look for when choosing a WordPress hosting company :
- Memory: the more the faster your website.
- Type of service : telephone, email, chat and at what times. 24/24 and 7/7 ?
- Backend access via cpanel or plesk so you can manage the settings yourself.
- How often are backups made and do I have access to these backups myself.
If the hosting quality is essential for the bottom line of your business plan (at e-commerce, for example), it’s not a good idea to take the cheapest shared hosting. After all, the responsiveness of your site has a direct effect on sales.
A slow site can drive away potential customers, and in a highly competitive market, you can’t afford to lose any sales. So while it may be tempting to go with the cheapest hosting option, it’s important to consider the long-term effects of a slow site. Ultimately, it’s up to you to decide what’s more important: the upfront cost of hosting or the long-term sales of your business.
In general, we can say that there is a positive relationship between the profitability of your site and its speed. So don’t be too stingy and choose a good hosting package with decent support.
6. Install WordPress
Now we have finally come to the WordPress part and start to build a WordPress website. Usually, this is very easy because most companies provide some sort of “1-2-3” install wizard.
Important : when installing WordPress, do not use “admin” as user name. Use your own name or alias.
7. Find a good WordPress theme
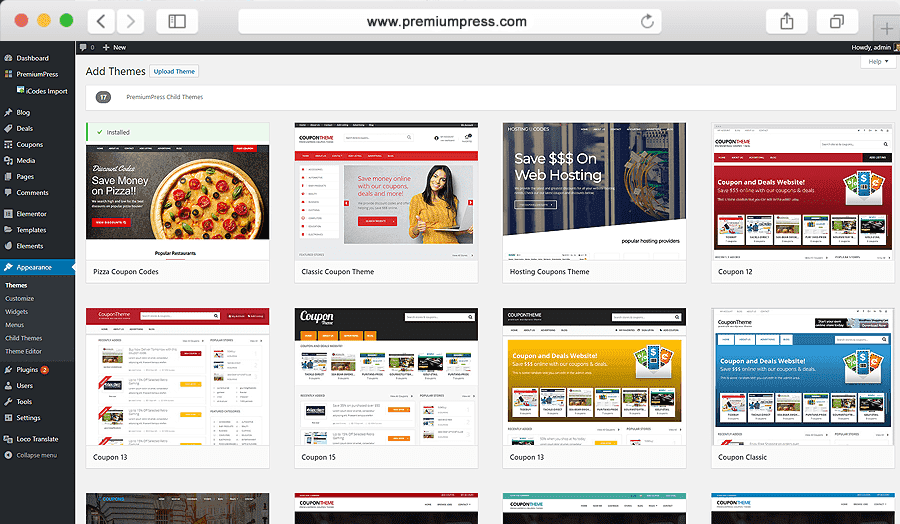
The search for the ideal theme is quite nice. But it does take time.
What should you pay attention to when choosing a theme?
- Take popular themes that have already sold a lot.
- See if the themes are popular and they get good ratings.
- On themeforest : also look at the support questions and see if the answers follow quickly.
- Choose paying themes for the many possibilities in terms of layout and design.
- Read the manual of a purchased theme
8. Make an inventory of all the pages of your website
Make an inventory of all your pages. This will be the future sitemap. An inventory mainly means :
- The pages (home, contact, services, about us, etc.)
- Your news categories (if there are any)
- Make sure the structure is hierarchical and well-organized)
A sitemap actually has two important reasons. On the one hand, a sitemap helps the search engines to find every page of your website. On the other hand, a sitemap ensures that the most important keywords are easier to find.
Our golden tip here is to start with this exercise before you get started with WordPress and start posting pages and blog posts effectively.
Again, a logical page layout gives structure and direction to your project. If you start creating pages but don’t know yet if and where that page should be on your website, you’re guaranteed to get lost once you have to create a menu for example.
9. Choose a page builder plugin
Nowadays, you’ll find great tools in WordPress to create the most complex page layouts. From Elementor to Divi to Visual Page Composer. Each has great features that will allow you to create beautiful layouts and reproduce them with minimal effort on other pages of your website.
Personally, we are fans of Elementor.
Beware: not every page builder is compatible with every theme. Some themes come “pre-packaged” and have a version of a page builder already integrated with the chosen or purchased theme. Check carefully which page builder is included and if necessary check with support if the theme is compatible with your chosen page builder.
Our advice : first learn a few basic techniques to master your chosen page builder. Once you have a “minimum knowledge”, start creating the final pages of your website. (step 11)
10. Make small sketches of the various pages
If there’s 1 thing I’ve learned before creating page layouts, is to work purposefully towards a result. In my experience, a short sketch or a basic mock-up will make you more deliberate and easier to come up with a result.
Not only the design will become easier, you will also pay more attention to the user experience and visual hierarchy. By limiting yourself to the bare minimum, you will naturally bring other elements than the design to the foreground.
You’re also going to present as many of the elements you have available (see phase 1) in a user-friendly way on the various pages you’re going to create. For this, go through the inventory of your website (phase 7) and create the layout for each page.
You can do this on a sheet of paper but there are also handy tools for this. A useful free tool is wireframe.
11. Create the layout for the different pages
Now that you have an idea of the layouts you want for your page, it’s time to start working on it. You’ll use your chosen page builder to recreate the layouts as faithfully as possible.
- In this phase, you’ll need to:
- Choose the right type of content for each layout.
- Make sure the layout is easy to navigate and use.
- Add any necessary features or functions.
- Test the layout to make sure it works well.
With your page builder, you should be able to create the layouts you want easily. Just be sure to take your time and double-check everything before you publish it.
12. Organize your (news) messages + planning
A blog is quite a contradictory item. Some people are in favor of it, others are not. The presence of a blog or news section is not mandatory. But it helps tremendously to increase the findability of your website.
Think about it from the reader’s point of view. Everyone knows that you are a great specialist in your field, but here the rule applies: Keep it simple en stupid.
13. Think about SEO via Yoast and think about the numbers: Install Google Analytics
Now that we’re in the final straight for the finishing touches to the site, it’s important to think about SEO (search engine optimization). You can’t really ignore the fact that Yoast the plugin is to help you improve the findability of your website in google.
Yoast helps you to set the technical SEO settings correctly. On the other hand the plugin also provides content optimization on page or post level.

The must-have is Google Analytics. This free tool allows you to map all your visitors in detail. But not only that. It also allows you to see if the goals you formulated in phase 1 have been achieved.
Not so familiar with SEO yet? On our blog you’ll find a section entirely dedicated to SEO.
14. Think about security: Wordfence + good practices
Your website is now ready to be unleashed on the world. But the world is not always a safe place, and you are actually obliged to think about the security of your website. I have been a fan of the plugin Wordfence. With this plugin, you not only protect your website against the most common hacking attempts, but you also have a 24/24 and 7/7 monitoring system that notifies you immediately if there is a problem with your website.
There are also two golden rules to keep your WordPress site safe :
- Use a complex password. You can use LastPass.
- Hou je software up-to-date : WordPress core, thema’s en plugins.
15. Let your website evolve
The times are over when a website was put online and then not looked at for years. Let the delivery of your website be a starting point rather than an endpoint.
- Learn from your statistics from Google Analytics: find out what is popular and where the visitors spend the most time
- Experiment: add an extra form, change texts
- Share your news and updates on social media
- Keep your website up-to-date with current and exciting content
Voila, now you are entirely ready to start to build a WordPress website.
FAQ
What is website hosting?
website hosting is the space on the web where your website is stored. Website hosting companies provide the space on the server that your website lives on so that your website can be accessed from any place with an internet connection.
Can I build a WordPress site for free?
Yes, you can. What is not free is the hosting for your website.
How much does it cost to get a WordPress site built?
The cost of most WordPress sites varies greatly. However, with WordPress, most of the cost is in the design and customization of the theme. A theme can be $40 or more, or much cheaper. WordPress itself, however, is free.
Can a beginner build a WordPress site?
Yes, a beginner can build a WordPress site. It may take a little longer and require some outside help, but it is possible. WordPress is an excellent platform for creating a website or blog. There are tons of resources and support available for beginners. With a bit of patience and effort, anyone can create a professional-looking WordPress site.
